Throughout this website you'll see icons like the one to the left. It signals an invitation for you to solve a problem, create a problem, or work with some concept in your personal journal. This page describes what a personal journal is and how to keep one.
What is a Personal Journal and Why Should You Keep One?
Many Knowledge Workers in the MG Taylor network maintain their own Journals. These are more than diaries... another name for them might be "Personal Invention Journals." Like the ones that Leonardo DaVinci and Thomas Edison kept. Or like an artist's sketch book. It's a place to record great ideas or plans. It's also a place to wrestle with understanding complex subjects. And it's a log of the evolution of our ideas over the years.
Our journals are filled with drawings.We call them annotated diagrams. While most diaries are filled with paragraphs of text and may have a picture or two in the margins, our journals place the diagrams front and center. The text--labels, headlines, captions, lists--supports the diagrams.
To create and solve complex problems we often need to see the situation from many vantage points. Sometimes we need to talk it out or act it out, or write it down. Sometimes we need to picture it in two dimensions on paper--as a drawing.
Materials and Stuff
A good artist doesn't need a whole bunch of tools. Most can work miracles with a simple pencil. But, hey, who said we're good artists!? Buy a bunch of tools and play with them until you find a set you like to use.
There are so many tools for creating art and so many ways of using them that we only touch on a few here.
In general, you'll be more pleased with the results if you use higher quality paper and writing instruments. But it's not necessary to spend a bundle. Start with these items that you can purchase from an art supply store or crafts store. Or order them from one of our knOwhere stores (888.363.2002):
A soft drawing pencil--HB or 2B. You can do the entire Journal in pencil if you wish. Try an assortment of hard and soft leads. | |
A Sharpie fine point. You can also get the extra and ultra fine point pens. They're great for headlines, borders and outlining. | |
Calligraphy markers have a chiseled point that's useful for headlines and titles as well as for traditional calligraphy. | |
Try a few Micron Pigma pens. They're a little pricy but you can get some wonderfully fine lines with them that are great for detail work. | |
Don't forget color! Try a set of 12 or 24 artists (soft lead) colored pencils. We recommend either Berol Prismacolor or Faber Design brands. | |
If you have some cash left over, try some permanent art markers. Again, Berol and Design both make good, non-toxic pens. Get some greys to use to add shade and shadow to your diagrams. |
You'll also need an eraser. Try a kneaded eraser instead of an ordinary one.
Buy a spiral bound or hard bound pad of drawing paper like Strathmore's 9x12 Premium Recycled Sketch. If you have to skimp on something, don't skimp on the paper.
How to Begin
1. Leave two blank pages in the front of your Journal for a title page and a table of contents.
2. Some of the writing instruments use inks or bases that bleed through paper. Use a blank piece of paper as a backing divider between the page you're working on and the one behind it.
3. You can orient your Journal any way you wish: vertically, horizontally or at an angle.
4. Experiment! Don't worry about "ruining" a page.
Composing and Templating a Page
Number each page. Put the number and title into your table of contents. You may choose to put a border on each page, or let the paper be the border. Date each page. |
Building a Page Using an Annotated Diagram
Frequently we begin design work with words: memos, outlines, bullets. Then we may add clip art, icons or diagrams to support the words. That's OK, but sometimes we need to draw a picture that captures the whole idea, and then label the picture and write text to support the picture. That's what annotated diagrams are all about.
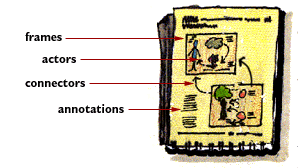
Think of diagrams having four building blocks:
1. Frames. Frames are just ways of marking off territory. Stuff happens in frames. If you're diagramming a floor plan, then each room may be a frame. The border you draw on you page is a frame. If you're drawing a living cell, then the cell wall may be a frame.
2. Actors. These are the major components of your diagram. Each box in a flow chart is an actor. Stick figures or other drawings representing people are actors. Trees, circles, flowers, clouds. These are all actors. And the actors live in frames.
3. Connectors. Actors, well,... they act. And they act upon and with and through one another. Connectors show which actors have relationships with one another. Two boxes in a flow chart may be connected with a line. Mom and Dad may be connected with a line. Frames and connectors are both ways of showing how actors are related to one another.
4. Annotations. Finally, add notes, labels, phrases, paragraphs that describe the frames, actors and connectors.
Some Examples of Using the Tools
(None of these trees were created by artists--anyone can do this level of work!)
Example 2 This tree was first lightly sketched in with pencil. When the Journalist was happy with the sketch (after some erasures) the outlines were drawn in with felt tip markers (like the Sharpie mentioned above). The dark areas on the leaf masses were made with a warm grey marker (30%) like the Berol or Design Art Markers. The dark area on the trunk of the tree was done with a 50% warm grey marker. | |
 | Example 3 This tree was first sketched as in the previous example, using pencil. A fine point marker like the Micron Pigma mentioned above was used to outline the branches, trunk and leaf masses. The grey marker was applied just as in example 2. Then colored pencils were used to color the trunk and leaf masses. |
 | Example 4 The Journalist used only colored pencils to create this tree. Note how many colors other than green were used. The underside of the leaf masses are shaded with blues and purples. The tops are shaded with yellows, light blues and light greens. The trunk has red and brown on the light side, and dark blue and red on the dark side. The streaky look was created by lightly rubbing an eraser over the finished drawing. |
Resources and References
There are many, many excellent books about drawing on the market. One excellent book is The Complete Sketch, by Robert S. Oliver.
(source) http://www.mgtaylor.com/mgtaylor/persjrnl.htm


No comments:
Post a Comment